William the Conqueror

An Arrow in the Dark

An Arrow in the Dark

Legacy

On 14 October 2016, thousands of people gathered in a field near Battle Abbey, Sussex. They had come to celebrate a re-enactment of the famous Battle of Hastings, one of the few dates that everyone can remember from the history books, 1066 – the year English history began! Or so it would seem from the collective national consciousness. England in fact had a proud history as a united kingdom, going back nearly 150 years before Hastings.

However by 1064, England had become entangled in national turmoil, as the ailing King Edward the Confessor was increasingly frail with no descendants to continue his legacy. To make matters worse, the kingdom was beset by foreign enemies, as jealous onlookers sought to steal the nation’s wealth and take advantage of the impending dearth of English unity. Across the North Sea were the Anglo-Saxons’ old foe, the Danes, who had invaded England many times over. The Welsh, Scots and Irish were emboldened by the waning of England’s defences, while restless powers in Normandy dreamed of conquering a new prize. Complicating the matter further, King Edward had family ties to both ruling houses in Denmark and Normandy. His mother Emma of Normandy had remarried to Edward’s predecessor King Canute, the Danish-born ruler of England, Denmark and Norway. King Edward had a close connection to Normandy through his mother’s family and had spent years in exile there before his own accession to the throne. Throughout his reign Edward embarked on a Normanisation of England bringing in many Norman advisers, clerics and courtiers.

Rise of the Godwins

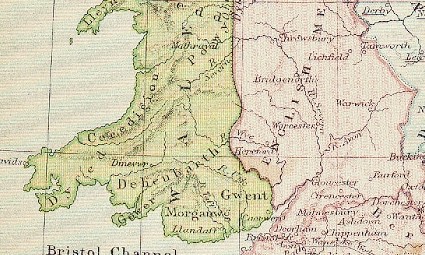
Though Edward had a natural heir in his great nephew Edgar the Aetheling, Edgar was young and ill-equipped to deal with the numerous threats to English sovereignty. To this end stepped up the king’s brother in law Harold Godwinson, Earl of Wessex, the second most powerful figure in the land. A capable military leader, Harold was imbued with confidence following victory over the Welsh and Gruffydd ap Llewelyn in 1063. What young Edgar lacked, Harold possessed in spades- vast wealth, courtly influence, and universal respect among peers. If anyone was to guard England’s interests and defend against growing Norman influence at court, it would be Earl Harold.

Harold was born circa 1022 into a noble family, the son of Godwin, Earl of Wessex. As a powerful noble, his father had close ties to the previous regime of Canute, and conspired in the death of Edward’s brother Alfred Aetheling in the chaotic reign of Cnut’s son Harthacnut. Godwin had such influence that he acted as king maker in the succession of Edward in 1042, and arranged the hand in marriage of his daughter, Edith. They had no children and Edward harboured lingering resentment to the Godwins, banishing them in 1051. It was only through force of arms that Godwin compelled Edward to restore their estates. In such a malaise, Harold succeeded to the Earldom in 1053, making him an influential political figure.

Harold and his wife Edith Swann Hnesce or “gentle swan” were married in the Danish manner, as befitting the custom of the time. He earned his stripes in battles against Magnus king of Norway, and drove back the Welsh from Herefordshire, eventually defeating king Gruffydd ap Llewellyn in 1063. His star was clearly rising, and it would not be long before Harold controlled all England.

A mysterious voyage

It is quite unknown how Harold ended washed up on the coast of Ponthieu in 1064, but he had presumably sailed from Sussex on a mission shrouded in secrecy. He had the misfortune of being blown off course and shipwrecked, then captured and held hostage by Guy Count of Ponthieu. Ten years previous, Guy had lost against Normandy in the battle of Mortemer, 1054. As Normandy’s vassal, he handed over Harold to the Norman duke William, who seemingly treated him well. Harold joined the duke’s retinue and fought for William against his rival Conan, Duke of Brittany. The campaign was successful and Harold was knighted by him, having saved two of his men from the perils of quicksand near Mont St Michel. The two nobles struck an agreement and parted ways, though the substance of such a bargain remains a matter of great contention. The Normans maintained that Harold swore an oath of fealty to Duke William and supported his claim to the English throne, in apparent fulfillment of a promise by Edward the Confessor. If the king had made such a promise, he truly had lost his marbles, for it was the Witenaġemot, or counsel of eoldermen, that decided on the English kingship. It was certainly not the place of either Harold or any other noble to promise the crown to William.

Harold’s younger brother Tostig became Earl of Northumbria, though was deeply unpopular. Considering the threat from William, Harold was forced to exile him in 1065 to ensure loyalty in the north. Tostig grew bitterly resentful of Harold and plotted vengeance, scheming to overthrow him with the help of Baldwin Count of Flanders. The following year, Tostig raided the coast and invaded England, though was forced to retreat to Scotland. He would later lend his support to the Norse.

Succession

The passing of a monarch in medieval Europe was always a momentous event, though in the case of England in 1066 the stakes were higher than ever. As king Edward the Confessor lay on his death bed, he commended the kingdom to his widow Edith, and entrusted the nation’s protection to his then reconciled brother in law Harold Godwinson. King Edward died on 5 January, and power shifted rapidly to Earl Harold. Confirmed king by Witan convened the following morning, Harold was crowned, perhaps at Westminster. Knowing that William of Normandy had designs on his kingdom, he rapidly moved to consolidate power and prepare England’s defences. William immediately planned to invade following news of Harold’s succession, preparing a fleet of over seven hundred ships. When Harold discovered William’s plans he levied an army to counter the threat, but was forced to disband troops when the invasion did not immediately materialise. In April Halley’s comet appeared in the sky, marking an omen of change, the comet became associated with England’s succession crisis.

The Norman fleet was forced back through bad weather, and the first threat came instead from king Harald Hardrada of Norway, convinced by Tostig to invade England. In September 1066 Harald’s invasion fleet of 300 ships sailed up the Humber. It was at Fulford, Yorkshire that the invaders clashed in battle with English earls Edwin and Morcar, where the English forces suffered defeat. Harold Godwinson was forced to mobilise his troops, including an elite force of huscarls. In only four days, the king marched his army up the old Roman road of Ermine Street to York, surprising the invaders at Stamford Bridge. Many of the Norwegian forces had stayed behind to guard the fleet, and some were without armour. Harald’s forces retreated across the bridge, where a single Norse axeman held up the advance of the English before being slain. The Norse made a shield wall and the English outflanked them and charged. The fighting was intense and lasted most of the day, though the English won a complete victory. Both Harald Hardada and Tostig were killed and the Norse army virtually extinguished. Harold accepted a surrender from the remaining Norwegians, and the survivors sailed away in only 24 ships.

Hastings

William of Normandy’s original invasion fleet was blown off course by bad weather. King Harold had in response summoned the fyrd, an Anglo Saxon fighting force of landowners. William’s fleet of over 700 ships sailed in September and landed at Pevensey. The Normans fortified their position and sacked local settlements. Such an invasion could not have come at a worse time for Harold, who was travelling down to London after fighting the Norwegians, having left many forces in the north, including the Earls Morcar and Edwin. Harold’s army hurried south averaging 27 miles a day. Tired from the exertion, the English encamped near Hastings. All overtures of diplomacy failed and the two armies seemed destined to meet on the field of battle. Both forces had over 7,000 men, though Harold’s army was infantry while the Norman’s were composed of infantry, cavalry and archers. Harold’s brothers Gyrth and Leofwine were loyal to him and would fight alongside him.

On the day of confrontation, Harold deployed his troops in a dense formation atop a steep slope, with the flanks protected by woodland. To attack, the Normans were forced to cross marshy land in front of them, though the Anglo Saxons had no archers to take advantage of the  slope. In response, William divided his forces into three groups, the Bretons, Normans, and French, taking charge the Norman division personally. Alan the Red commanded the Bretons while William FitzOsbern ordered the French.

The battle commenced with the Norman archers firing at the English infantry, though the defenders formed a shield wall and the arrows had little effect. After running out of arrows, the Norman spearmen advanced uphill, and were caught off-guard by a volley of spears. The two sides clashed, and the English shield wall held strong against the Normans. The battle continued in such vein for some time, before a lull in the fighting. Failing to gain advantage, the Norman forces withdrew from battle temporarily.

Hoping to force a path through the opposing infantry, William commanded a frontal cavalry charge against the defensive line. In the general melee that ensued the English resisted the Norman assault manfully, while fighting the attackers back with vigour. The Normans were losing men and ground, as the Anglo Saxons took confidence from their excellent position. Harold’s army was gaining the upper hand, and the Normans began to retreat, beginning with the Breton flank. Duke William had no less than two horses killed from under him, and was forced to retreat on several occasions. Around the battlefield there were cries that William had been killed, and Norman soldiers and mounted knights fell back in disarray. The defending English pursued in earnest, though Harold ordered his men to stand ground. Despite the order, many of the English followed the Normans, perhaps lead by Harold’s brothers Gyrth and Leofwine.

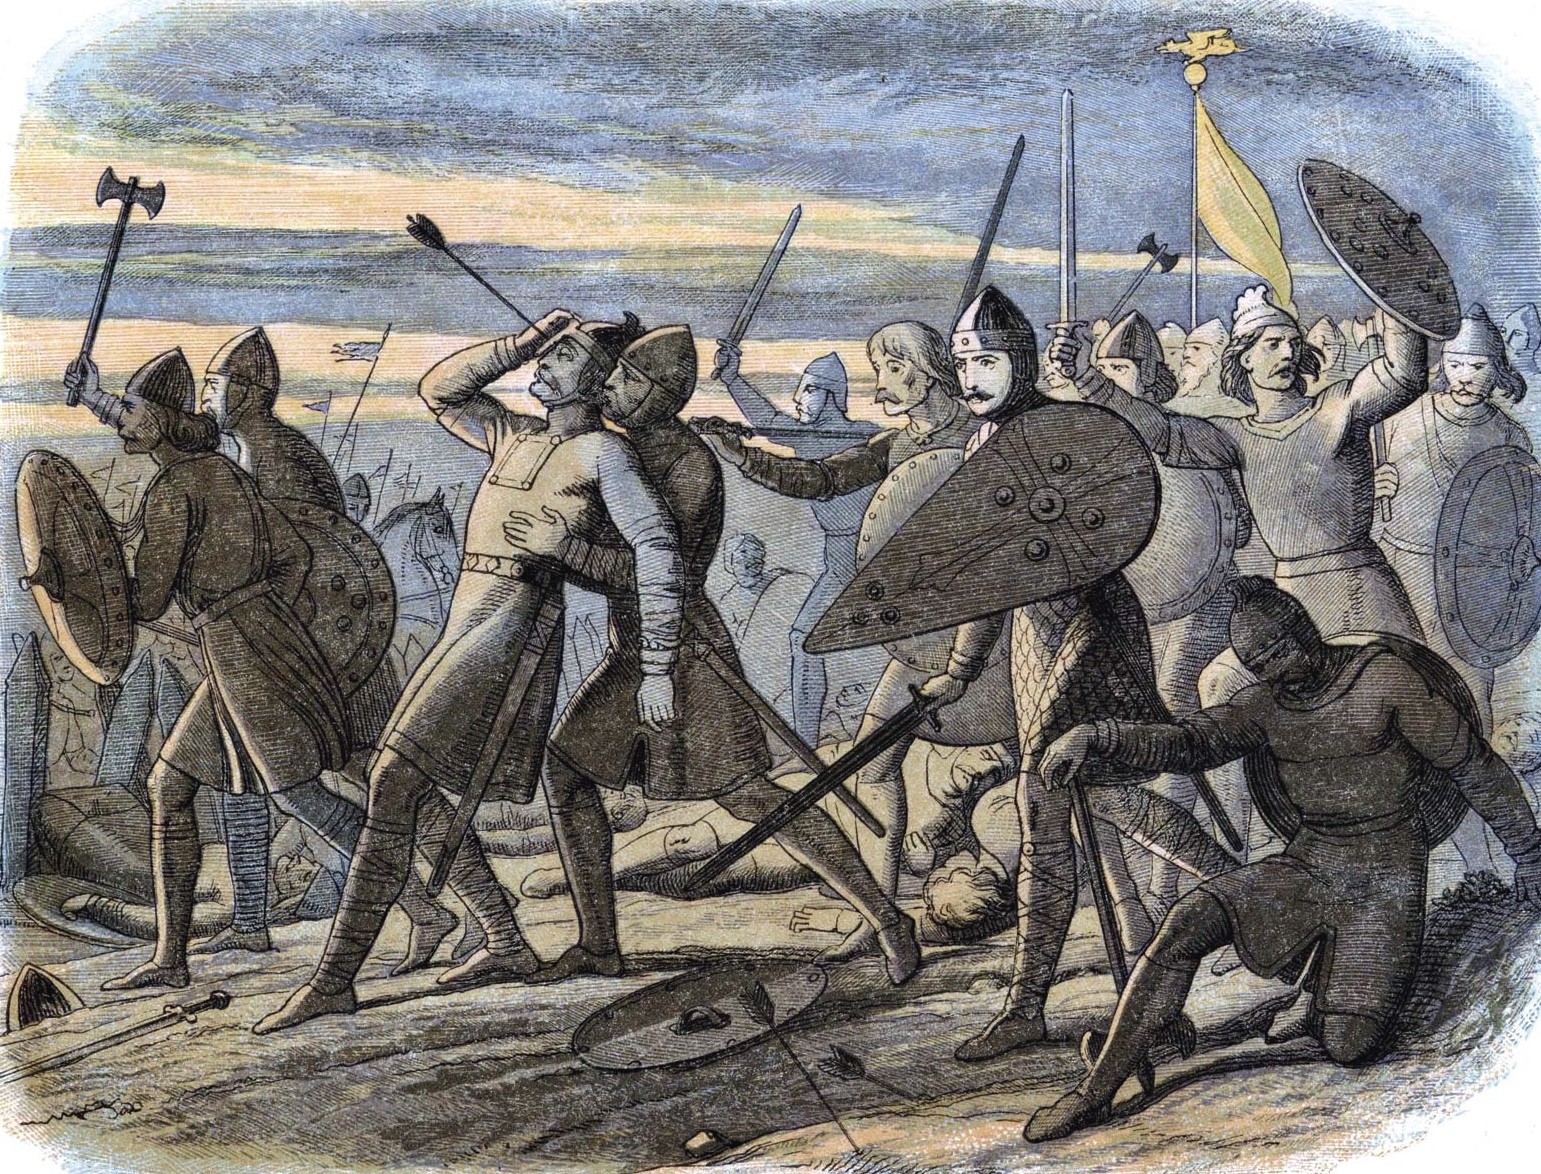
It was at this point that William lifted up his helmet to show he was alive, and rallied the Normans around him. The English in their rush down the hillside had lost their defensive formation and suffered terribly against the renewed Norman charge. Gyrth and Leofwine fell in the fighting, and Harold was eventually surrounded, protected only by his elite guard of huscarls. Harold fell in battle against the Normans. Seeing the death of


  1. The earliest records mention only that Harold was killed in the battle. His body was mutilated but was later identified by Harold’s fair widow Edith, who recognised his body by “certain marks familiar only to her”. This suggests that Harold was killed in a melee combat. The story of Harold being killed by an arrow appears only later, by a writer who had neither first hand knowledge or experience of the battle. Crucially this was after the creation of the Bayeux Tapestry.
  2. Harold apparently went back on his word to William according to the Normans, having promised William the throne in the succession of the Kingdom of England. This was the main justification given for the Norman conquest of England. For a long time before this period in the Middle Ages the punishment for dishonesty was to lose an eye. Therefore it’s hardly surprising that later chronicles might attempt to revise history to say that Harold was killed by an arrow in the eye, which would be interpreted as divine punishment and reinforce William’s right to rule.
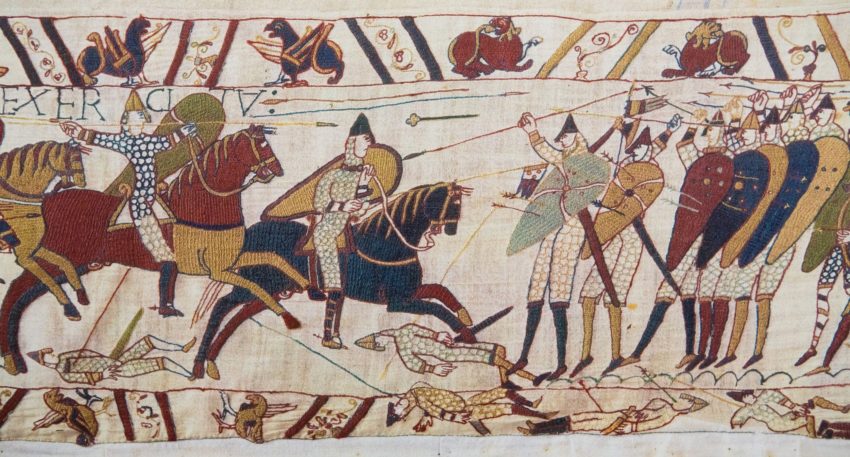
  3. One of the main sources of evidence cited in support of Harold being killed by an arrow is the Bayeux Tapestry. As a detailed illustration created soon after the Battle of Hastings, it is seen as an important near contemporary source of information for the events of the Norman invasion. A closer inspection of the tapestry reveals that the illustrated narrative does indeed support the earliest historical records of the battle. At the part of Harold’s death, the tapestry reads Harold Rex Interfectus Est. (King Harold has been killed). Below the second part of the writing the tapestry shows a Saxon fighter being killed by a mounted Norman knight.
  4. To the left of this warrior’s death, there is a soldier who it seems is struck by an arrow in the head. This figure can be clearly identified as a Saxon. The word Harold appears immediately above his head which for a long time has been assumed in support of identifying the man as Harold, king of England. However, the writing does not conclusively identify the individual as Harold. In many other places in the tapestry, writing refers to events taking place in the tapestry not immediately below the writing, and this is quite reasonably the case here. This is especially so if the Saxon on the left is not shown as being killed.
  5. The Bayeux tapestry as we see it today was restored in the 18th century. Sketches of the tapestry before the restoration do not show the arrow, and as such it is the result of a later alteration. The most likely interpretation is the Saxon soldier was carrying a spear. During the restoration the spear was partly removed and fletching added to form an arrow. This was done to align the tapestry to the arrow story which by that time was widely accepted. Upon close inspection of the tapestry this is still obvious today, as the line of the arrow angles over the top of the victim’s heard. Once the support for the arrow from the Bayeux tapestry can be discarded, the majority of supporting evidence for the above assertion falls away.
  6. Friendly fire? In the tapestry, Harold is killed in a brutal melee at a point nearing the end of the battle, after the battle turned in favour of the Normans. By this point the Normans had carried out several charges and pressed the Saxon defence to breaking point. Once the melee had begun, the Normans would not have fired arrows at their own knights or their leader Duke William, who was heavily involved in the throng of fighting. Research suggests the tapestry is an accurate depiction of contemporary warfare and is corroborated by archaeological findings.
  7. The Saxons fought in a shield wall, a technique long practiced by the Saxon peoples, and originally created in antiquity. To form the wall each soldier would hold up their shield and raise their spear, and would initiate this formation at the prospect of a cavalry charge. A close look at the tapestry in this scene shows that the soldier hit by an arrow is holding arm in the same position as the soldier to the left of him who is carrying a spear.
  8. The angle of the supposed arrow hitting the Saxon in the head is completely wrong and on reflection, has always seemed a bit strange. During a battle, archers would engage the enemy army by firing a volley into the mass of opposing troops, angling their bows upwards. This means arrows would rain down on the unfortunate victims from above. The arrow would not have hitting Harold at such an angle unless the archer was lying on the ground in front of him!

So it is that the myth of an arrow in the eye was born.

Posted by David Mortimer in History, 1 comment
Chapter 2. The Welsh Marches

Chapter 2. The Welsh Marches

Origin of the March

The ancient word for boundary, the March marked a borderland between two competing centres of power. In modern English, original meaning of March is reflected in the word margin. The Welsh Marches were the loosely defined lands on the margins of England and Wales, which throughout the Middle Ages were dominated by the power of the Marcher barons. The Marcher lordships had a unique status. The lords who controlled the March had great wealth and power, and exercised considerable independent authority, away from the prying eyes of the King. Whilst England existed as a united realm, Wales remained a collection of separate principalities, sometimes in conflict but united by shared ties of language and culture.

Immediately after the conquest, king William I looked towards England’s borders. Eager to counteract the threat of the Welsh across the border, he installed three of his most trusted followers as Earls in the Welsh Marches. William FitzOsbern, Hugh de Montgomery and Hugh d’Avranches were appointed the Earls of Hereford, Shropshire and Chester respectively. They were invested with significant power and tasked with pacifying the turbulent Welsh, by any means necessary.

Fortification of the Marches

The Normans brought their own advanced skills in castle building to England and the Welsh Marches. Castles would prove increasingly important in the centuries ahead, providing the key to securing an effective hold on a region. The first castles to be built in the Welsh Marches were small motte and bailey castles, much like Mortemer castle in Normandy. Over time, fortifications improved as castles were rebuilt in stone, with extended battlements, towers and curtain walls. 

In reality, the Marcher lords ruled their estates like kings in their own right, raising taxes, levying armies, and every so often, invading their neighbours. Constantly restless, they were always looking for ways to gain more wealth and expand their territory. This made Wales a target, and Welsh lands became a battleground for aspiring Norman knights.

The Conquest of Maelienydd

One such knight was young Ralph Mortimer, who arrived in the Welsh Marches not long after the conquest. Imbued with a youthful vigour and determination, Ralph led the conquest of the Welsh region between the Wye and Severn rivers, known as Maelienydd or Ferlix. From the 1070s, Ralph consolidated his power by building castles at Dinieithon and Cymaron, using the latest Norman building methods.

For his achievements, Ralph was rewarded with extensive lands by the King, but this was not the limit of his ambition. When FitzOsbern’s son Roger Earl of Hereford rebelled, Ralph seized an opportunity. He assisted the king by attacking the Earl’s castles, helping to bring an end to the rebellion. Ralph acquired FitzOsbern’s castle of Wigmore, which would become the family’s principal seat of power for generations.

Inheritance 

Around 1080, Ralph’s father Roger died and Ralph inherited all his estates in both Normandy and England. He married first Millicent (d. before 1088), by whom he had a daughter Hawise, and secondly Mabel, in about 1090. Mabel bore him four sons, Roger, Hugh, William and Robert. Ralph’s daughter Hawise married Stephen Count of Aumale, son of William the Conqueror’s sister Adelaide. Ralph continued to faithfully serve King William, and gained over 200 manors for his loyalty. Though he did not have time to visit them all, the income from these estates would prove especially useful in funding Ralph’s military exploits.

Leadership Crisis

When William the Conqueror died in 1087, his third son William Rufus was crowned while his eldest son Robert Curthose became Duke of Normandy. Loyalties were divided between the two rulers, creating a dilemma for barons with land both sides of the channel. For aggrieved lords, the solution was simple, to unite the Norman realms under a single ruler. The barons preferred Curthose for his weaker authority, so in 1088 rebelled against Rufus with the aim of replacing him with Curthose. The rebels were lead by King William’s uncles, the Conqueror’s half brothers Odo bishop of Bayeux and Robert Count of Mortain, two of the most powerful figures in Norman politics.  

Ralph Mortimer participated in the rebellion of 1088, joining with other rebels in laying waste to the King’s manors or those of his loyalists. William II defeated the rebellion through a combination of direct action and appeasement. Offering land and money to pacify the barons, he laid siege to the stubborn rebels’ castles, capturing their leaders. For his involvement, Ralph Mortimer was banished, and Wigmore confiscated. Returning to Normandy, Mortimer continued to undermine the King by supporting Curthose, acting as witness to his various religious charters.

Continuing grievances among the barons saw them once again rise in rebellion in the 1090s. Stephen Count of Aumale emerged as a popular figure among the rebels, and a conspiracy was formed to replace Rufus with Stephen. Ralph Mortimer conspired to assist his son in law in his quest for the throne, but William Rufus again defeated the rebellion through a combination of military action and diplomacy. 

In 1096, Robert Curthose joined the First Crusade for Jerusalem, departing Normandy for the Holy Land with Stephen of Aumale and many other knights. Rufus subsequently died in a suspicious hunting accident in the New Forest, and his younger brother Henry had himself crowned before Rufus was even laid to rest. In Duke Robert’s absence, Ralph pledged allegiance to the new king Henry, who restored the Mortimer estates. Returning into royal favour, Ralph was appointed Lieutenant of Normandy and supported Henry’s invasion of Normandy in 1104. The fighting came to a conclusion at Tenchebrai in 1106, where Henry was victorious in a decisive engagement. Curthose was imprisoned, and spent the rest of his life in captivity. Since the duke had been a thorn in the side of the king for years, his defeat ushered in a period of stability under King Henry. 

Succession

After Tenchebrai he retired from martial duties to focus on his spiritual obligations, for though he lived by the sword he above all wanted to secure access to heaven. He firstly founded a college of priests at Wigmore in 1100, which laid the foundations for a religious house there. In old age, Ralph also made a gift to Worcester Cathedral Priory, with the assent of his sons. He died sometime after 1115, when the Lindsey Survey of Lincolnshire was compiled. Ralph’s legacy was assured in the succession of his sons, between whom he divided his lands.

Anarchy and disorder

After coming of age, Ralph’s eldest son Roger Mortimer was knighted, perhaps by Stephen Count of Boulogne, grandson of William the Conqueror. Roger supported Stephen in his claim to the English crown, and perhaps became one of Stephen’s personal retainers. Though Stephen was well liked by the barons for his temperate personality, his claim was contested by Henry’s daughter Matilda. Following the death of King Henry in 1135, Roger Mortimer joined Stephen in his invasion of England. During the resulting civil war, Roger became a trusted military adviser to Stephen and commanded a royal army against rebels near Bristol in 1137. However Roger died soon after, perhaps in battle. With no lawful issue, he was succeeded by his brother Hugh, who took possession of the vast Mortimer estates.

Hugh had grown up in Normandy, inheriting over thirteen knight’s fees. He supported King Stephen and may have been one of his retinue. Upon coming to England, he commemorated his brother Roger in a grant to Kington St Michael nunnery, which preserved the memory of both his brother Roger and father Ralph. Hugh continued the work of his father by founding Wigmore Abbey in 1142. Though already in his fourties, Hugh saw the need to take a wife and married the widow Maud de Belmeis, widow of Philip. They had four sons; Ralph, Hugh, Roger and William. 

Advance into Wales

Hugh made Wigmore Castle his home, refortifying the walls and enhancing the living quarters. Aiming to recover the lost Norman estates in Wales, Hugh invaded Maelienydd in 1142, advancing into Welsh land with considerable success. Madog ab Idnerth’s sons Hywel and Cadwgan were killed in battle, and Hugh captured Cymaron castle, repairing the outpost as a base for further invasions. In 1146, Hugh invaded southern Maelienydd, causing the death of Maredudd ap Madog. 

Resistance to Henry II

Hugh remained a loyal supporter of King Stephen throughout the lawless period of Anarchy, which lasted for nearly twenty years. Empress Matilda eventually abdicated her claim in favour of her son Henry, who succeeded to the throne in 1153. Soon after his succession, Henry built up his power base and demanded the return of royal castles. Hugh de Mortimer resisted, and seized control of Bridgnorth. When Henry besieged Wigmore, Hugh was forced to surrender, but his lands were eventually returned. Hugh remained stubbornly resistant to the new king’s authority, and in 1155 once again refused to submit. Henry responded by laying siege to Hugh’s castles, razing Cleobury to the ground. Upon Henry’s siege of Wigmore and Bridgnorth, Hugh finally submitted to royal authority. At the Council of Bridgnorth, he agreed to return Bridgnorth to the crown in return for holding Wigmore.

Hugh lived into old age and died in 1185, when he was succeeded by his third son Roger, born c.1153. Roger was perhaps the first Mortimer Lord of Wigmore to be born outside Normandy, and continued to press invasions in the Welsh Marches.

Continue to Chapter 3. The Struggle for Welsh Power – Dynastic conflict in the Welsh Marches and the struggle to control Wales. 

Chapter 1. Mortimer Origins

Chapter 1. Mortimer Origins

Men of the Marshes

The Mortimer surname’s origins date back a thousand years to eleventh century Normandy. By this time, the village of Mortemer-sur-Eaulne had developed in the Pays de Bray region of Normandy, between the historic cities of Rouen and Amiens. The old French word ‘bray’ meant a swamp or marsh, while the place name Mortemer also derived from such a description. The Latin word ‘mort’, meaning die, combined with the old French ‘mer’, for lake or sea, can be translated as ‘dead water’ a poetic description of the stagnant water of the Pay de Bray’s marshland. Mortemer castle was constructed in 1020, and by 1054 had come in to the hands of Roger FitzRalph, a Norman knight. Fitz meant son, and as a son of Ralph de Warenne, Roger was distantly related to William Duke of Normandy. His mother Béatrice de Vascoueil was apparently a niece of the duke’s paternal grandmother Duchess Gunnor.

The Normans were originally the “Northmen” from Scandinavia, descended from the Vikings who raided Europe in the eight to tenth centuries. A powerful Viking chieftain named Rollo conducted raids along the French coast. In one such raid he kidnapped a young Brittonic noblewoman Poppa of Bayeux, and married her in the Viking fashion. He eventually returned to the region to settle permanently, establishing a separate County in northern France. Rollo founded the line of Dukes of Normandy, and is an ancestor to all subsequent royal houses. The Normans soon converted to Christianity and adopted Frankish customs, making an indelible mark on the region. They transformed Normandy by building magnificent churches, abbeys and castles, one of which was the castle of Mortemer. The medieval Mortimers were ultimately descended from Vikings and seemingly inherited their warlike nature. 

The Battle of Mortemer

The French King Henry launched an invasion of Normandy in 1054, supported by his brother Odo. Targeting the Norman county of Évreux, Odo invaded Eastern Normandy supported by the French Counts Renaud of Clermont and Guy of Ponthieu. Together they pillaged the countryside and caused widespread devastation. Whilst Duke William intended to lead the defence of Normandy against Henry, he sent an allied army to relieve Évreux, lead by Robert of Eu, and supported by Roger FitzRalph and Walter Giffard.

The French forces were more numerous than the Normans, but through their pillaging they had become scattered and disorganised. Encamping at Mortemer Castle, they soon descended into drunken debauchery. Sensing opportunity, Roger FitzRalph used his superior knowledge of the terrain to launch a surprise attack. Making a move before dawn break, Roger’s army ambushed the French, inflicting heavy casualties. In a fierce battle that lasted several hours, the Normans ultimately succeeded in gaining ground and routing the invaders.

Weighed down by heavy chain mail, many French soldiers drowned in the boggy conditions, while those soldiers who stayed on the battlefield were either killed or captured. The French commander Guy of Ponthieu surrendered and Roger FitzRalph personally captured Ralph de Montdidier, Count of Valois. The Norman victory was clear and decisive. Upon hearing word of the defeat, King Henry decided to retreat without engaging the Duke’s forces on the other side of the Seine.

This was an important victory for Duke William, as it secured Norman territory and promised stability of his Duchy. Guy of Ponthieu was imprisoned for two years and forced to pay homage, while Ralph of Valois was made a captive of Roger. However, as Roger’s feudal overlord and father in law, Roger treated him fairly. He accommodated the count at his castle and afterwards released him, incurring the wrath of Duke William.

For releasing the Duke’s enemy, Roger was punished with banishment. His estates in Normandy were confiscated, and Mortemer was given instead to Roger’s young kinsman William de Warenne, who had conducted himself admirably in the battle. Thus Mortemer was lost, and would never be within the family again. Despite this setback, Roger remained proud of his role in defending Mortemer from Normandy’s enemies, and took the name of the castle despite losing the lordship. He was known as Roger de Mortimer, essentially Roger ’of Battle of Mortimer fame’. The fact he didn’t use the name while lord there, but instead some time after, shows that the Mortimer surname is perhaps derived from the battle rather than the lordship itself.

The Conquest of England

Around the time of the battle, Roger’s son was born. He was named Ralph after his paternal grandfather, a Norman naming convention that the family would follow for centuries. Roger Mortemer was forgiven for his actions and granted the town of St Victor-en-Caux, Normandy, 25 miles West of Mortemer-en-Bray. By the time of the Norman invasion of England in 1066, Roger was by then in his 40s, with significant military experience. He had already shown his skill in battle and may well have been among the knights who sailed with William to England and fought in the Battle of Hastings. At the time, Ralph was likely a young squire and might have participated, but he was probably too young to fight. The twelfth century chronicler Wace writing a hundred years later, describes a Hugh Mortimer fighting at Hastings, but this must be in error as no such Hugh is known from contemporary sources. Only the names of fifteen men are confirmed by contemporary sources to have accompanied William in the conquest, including bishop Odo of Bayeux and Eustace of Boulogne, who both feature in the Bayeux Tapestry. Many more knights participated, and those who were granted land after the conquest were presumably so rewarded for their military service to the new King.

The Norman conquest changed England forever, transferring the feudal way of life from France. The surviving Saxon leadership in the country was immediately excluded from all office or property, while areas which resisted such as Yorkshire and the North were burned to the ground. English land was partitioned among the invaders on a scale seen neither before nor since. William the Conqueror as monarch took ownership of all English land, a legal status quo which technically continues to this day. The king divided the spoils of conquest among his lords and knights who had been loyal and supported him throughout the hard times. Twenty years after conquest, the new political landscape was reflected in Domesday. This ambitious national land survey was undertaken with the purpose of assessing the full wealth and resources of the country, and showed who retained property in every parish of England.

Though Roger Mortimer was granted land in England, he remained more interested in his Norman lands than the realm across the channel. Roger stayed in Normandy in the 1070s, and evidently spent his final years focused on religious devotion. He might not have visited England at all. In 1074 he petitioned for the Priory of St Victor to become an abbey, and he evidently died sometime after this date, upon which he was succeeded in his estates by his son Ralph. Ralph de Mortimer expanded the family’s horizons and was the first to spend a significant proportion of time in England. Ralph engaged in the Norman conquests of southern Wales and played an important role in the development of the Welsh Marches, the tumultuous border between Wales and England. With Ralph’s marriages and sons, the family line would become secure and expand into several offshoot branches by the 12th century. The Mortimers were certainly in England to stay.

Continue to Chapter 2. The Welsh Marches – Life on the frontier of England and Wales